Do You REALLY Know How to Ride a 20 Meter Circle?
The 20 meter circle is one of the most basic fundamental patterns ridden in dressage. It appears in training level and first level with the trot, stretchy trot, and canter. Most riders ride the 20 meter circle each time they are on their horse, but did you know that most people get it wrong in the dressage ring? The pattern is simple, yet people continuously ride it incorrectly and don’t even realize it.

The Letters are the Number One Reason People Fail the 20m Circle
Did you know that the dressage arena letters don’t really have anything to do with the 20 meter circle? The only letter that has anything to do with the pattern is the letter at which your circle starts. For example, “20 meter circle at A.”
Most people fail because they believe that the letters in the arena make up the four points of the circle, the north, south, east, and west. So they use the letters as a guide and ride the circle around to each of those four letters. This is completely wrong.
A 20 meter circle is a perfect circle with a diameter of 20 meters. So the “south” point of the circle will be directly 20 meters below, or across from, the “north,” or starting point, of the circle. The “east” and “west” points will be exactly 10 meters down and 10 meters over to the left and right of the starting point. And guess what? There are no dressage letters in those locations. Below is a correct 20 meter circle at A:

Many people make the mistake of riding from A to K to L to F, and back to A. But as you can see, the actual 20 meter circle does not touch K, L, or F. Below is a correct 20m circle in green and an incorrect on top of it in red:

As you can see, when you base your circle off of the letters, it’s not 20 meters and it’s not even a circle. This is the reason so many riders lose “free points” in their dressage tests. Accuracy is a crucial part of your score, and it is often the easiest part to nail. You do not need a fancy, expensive horse to ride accurately. So when you mess up your geometry, you are leaving easy points on the table. Learn more about how to improve your dressage scores here.
20 Meter Circle Dissected
Even though we don’t touch the letter in the 20 meter circle, we must still use the letters as a guide.
Let’s start off on a 20 meter circle at A, going right. You will track right, making an arc toward the wall, looking at K. But you will not touch the wall at K. You will touch the wall 4 meters past K. That’s about 12 feet after K.

For the next curve of the circle, you will be eyeballing P. Most people try to land at L, but there is no marker for the letter L, so they look at P instead. But remember that the bottom of your circle goes 2 meters beyond L. And P is in line with L. You will be looking at P, so aim for 2 meters past P. This makes the “south” point of your circle inline with A to the right of you and 2 meters past P straight ahead.
From there you are heading up towards the wall again, but don’t arrive at the wall at F. This time you will touch the wall 4 meters, (12 feet) before F. Again, use F as a guide, but remember that you are not going to F.
Finally, you finish up your circle back at A.

One way to test out your circle for evenness and symmetry is to count the number of steps your horse takes between each point. You should bet getting the same number as long as you have a steady tempo.
The 20 Meter Circle at B or E

Many riders make the mistake of riding to the letters here as well. But in this area of the arena your circle only touches the letters B and E. And the circle will always starts at B or E as well.
But when you ride all the way to L and I, you are actually creating an oval:
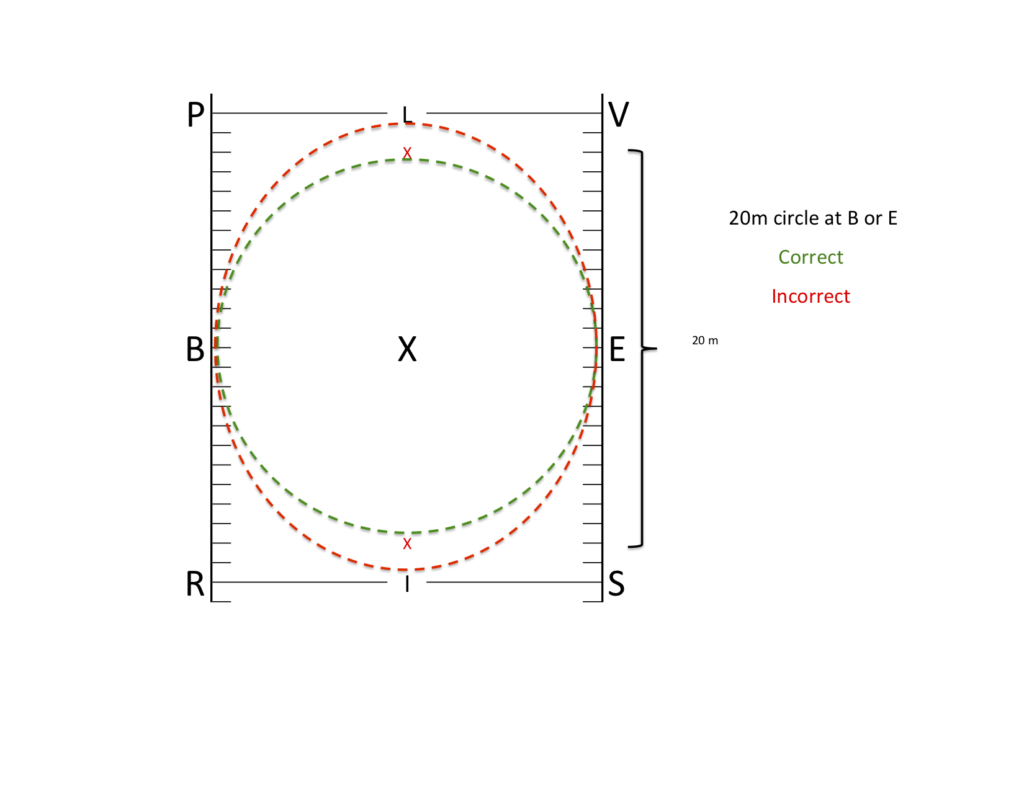
So this time you will make your “north” and “south” points 2 meters before the letters in order to make a circle instead of an oval.
Be Careful to Separate Your Corners From Your Circles
The next common mistake with 20 meter circles is that riders often mix in their corners with their circles, or their circles with their corners.
Remember that a 20 meter circle that starts at A, also finishes at A. So anything between A and A, needs to be on the arc of the circle. Anything before A or after the completed 20 meter circle at A, needs to be ridden “on the rail.” The rail consists of all four sides, plus the corners.
Many riders tend to end up on the arc of the circle before the circle starts. (say, at A) Then they do the 20 meter circle from A to A. Next they forget that the circle is now over and they keep going on the circle instead of going back into the coming corner.
Or they do it the other way by riding corners in parts of their circle. They go into the corner before A (which is correct). Then they start the 20 meter circle at A, but they go straight into that corner after A instead of starting onto the arc of the circle. Next, the bottom half of the circle is correct. But as they head back up towards A, they go into that corner as well, instead of staying on the track of the 20 meter circle.
See below how to separate corners from the track of the circle:

As you can see, you go into your corner before the circle, and stay out of the corners during your circle, and finally, go into the corner after your circle.
In training level, your corners are allowed to be as big as a quarter of a 20 meter circle. So you might get away with mix ups at training level. But for first level, your corners need to be like a quarter of a 10 meter circle, so you really need to show a difference at first level.
Think About Where You are Going
The take away message here is that it is really important to ride accurate figures in the arena. So many points are given up due to the misconceptions of the track of the 20 meter circle. Don’t let the letters fool you. Instead, use them as a guide to set you up for a perfect circle.
Keep Riding, Keep Refining
The Refined Rider